
🍪 Ultimate no bake cookie dough truffles: An irresistible no bake treat 🍫
1. Introduction
These no bake cookie dough truffles are the kind of bite that instantly sparks joy. Creamy, vanilla-sweet dough meets a glossy chocolate shell in a snap, with no oven required. When you bite in, the center feels velvety and lush, while the coating offers a satisfying snap. This guide shows you how to achieve that perfect balance of texture and flavor—without turning on the oven. If you love easy, comforting sweets, you’re in for a treat. For more quick ideas, you might also enjoy our spicy tteokbokki in 20 minutes and Crispy Air Fryer Mozzarella Sticks, both delicious quick-bite options: spicy tteokbokki in 20 minutes and crispy air fryer mozzarella sticks. For a lighter pancake-style option later, see fluffy pancakes perfect for two.Today’s feature, the no bake cookie dough truffles, is all about flavor-forward bites you can assemble in minutes, then chill until set. The key is a dough that’s rich but not heavy, and a chocolate shell that provides a glossy finish and a crisp bite. You’ll taste vanilla, almond-like butter, a whisper of salt, and, of course, chocolate that coats the center like a silky armor.
2. Why You’ll Love This Recipe
- Ready in 30 minutes or less. No bake means no oven time, ideal for quick cravings.
- Ice-belt chill factor. A quick chill sets the dough and makes dipping easy.
- Rich, crowd-pleasing flavor. A smooth, creamy center contrasted with a shiny chocolate shell.
- Make-ahead friendly. Perfect for gifting, party platters, or school treats.
3. Ingredient Notes
The dough comes together with pantry staples, but a few choices affect texture and flavor.– Edible cookie dough base: Use heat-treated flour or gluten-free flour to ensure the dough is safe to eat raw. Creamy butter and a touch of cream cheese create a luxurious base. If you prefer dairy-free, swap in dairy-free butter and vegan cream cheese for a similar mouthfeel.– Powdered sugar and vanilla: Powdered sugar dissolves smoothly to avoid a gritty texture, while vanilla deepens the flavor. If you only have granulated sugar, you can pulse a bit in a processor to mimic superfine texture, but powdered sugar gives a creamier finish.– Chocolate coating: High-quality chocolate makes a noticeable difference in gloss and snap. You can use dark, milk, or white chocolate depending on your taste. If chocolate seizes during melting, add a small splash of neutral oil or shorten the melting time in short bursts.– Mix-ins: Mini chocolate chips, tiny candy pieces, or a pinch of sea salt flakes can elevate the bite. For a nutty crunch, fold in finely chopped toasted nuts.– Quality ingredients matter: A creamy butter with a touch of salt, a tangy cream cheese, and good chocolate will keep the center rich yet light. If you want to streamline the process, you can substitute store-bought edible cookie dough, provided it’s egg-free and safe to eat raw.Internal curiosities you might explore for inspiration include our Big Mac Wraps and Healthy Apple Rice Pancakes for quick, crowd-pleasing ideas. If you’re craving a different crunch, the Crispy Air Fryer Mozzarella Sticks link can inspire a fun texture contrast in your kitchen experiments.4. Kitchen Tools You Need
While you can make these truffles with basic equipment, a few tools will speed things up and improve consistency.– A sturdy stand mixer makes creaming butter and cream cheese a breeze. KitchenAid Artisan 5-Quart Stand Mixer in Scorched Orange is a reliable workhorse that handles smooth doughs with ease.– A compact, reliable heat-and-melt setup helps you smoothly melt chocolate for coating. Compact 6-in-1 Digital Air Fryer by Amazon Basics can double as a controlled-mheat environment for chocolate tempering routines or quick cooling between dips.– A versatile cooking companion for prep and clean-up. Ninja Foodi Smart XL Indoor Grill & Air Fryer Combo offers precise temperature control that can be handy when you want to melt chocolate without scorching.– A reliable nonstick pan or sheet for setting and chilling truffles. For a robust nonstick experience, consider T-fal 14-Piece Hard Anodized Nonstick Cookware Set to simplify cleanup after dipping.If you’re curious about other kitchen upgrades, you might enjoy perusing the kit options in our shop links. These tools help not only with this recipe but with many quick, no-bake creations.5. How to Make Ultimate Easy Cookie Dough Truffles No Bake Treat
In a mixing bowl, beat softened butter and cream cheese until airy and smooth. The texture should resemble a soft, pale cloud. Add powdered sugar and vanilla, then mix until fully integrated. The dough should be thick but pliable—dipping will be easy, and rolling won’t stick to your hands.
Gently fold in mini chocolate chips or your preferred mix-ins. Scoop out small portions with a spoon or a small cookie scoop, rolling between your palms to form compact, bite-sized spheres. If the dough feels too sticky, refrigerate just long enough to firm up—about 15–20 minutes.
Set up a double boiler or melt chocolate in short bursts in a microwave-safe bowl, stirring in between until smooth and glossy. Dip each dough ball into the melted chocolate, turning to coat evenly. Place coated truffles on a parchment-lined tray to set. For a smoother shell, tap gently to remove air bubbles and return to the tray.
Chill the coated truffles in the refrigerator until the shell is firm to the touch, about 20–30 minutes. If you’d like, drizzle with a contrasting chocolate or a light dusting of cocoa powder for a professional finish. Once set, store in a cool place or refrigerate for longer shelf life.
6. Expert Tips for Success
– Use heat-treated flour or skip flour altogether if you’re worried about raw dough. This ensures safety without sacrificing texture. – Chill the dough briefly if it becomes too soft to roll. A short rest makes shaping easier and prevents smearing. – Dry chocolate coatings help set faster; keep the surface dry before dipping to avoid bonding issues. – If you want a dairy-free version, substitute dairy-free butter and cream cheese, and use dairy-free chocolate for the coating. – For an ultra-smooth shell, temper the chocolate slightly or add a tiny bit of coconut oil to keep it glossy. – Do a small test batch first to gauge viscosity and coating results; adjust sugar or chips if needed. – For a fun twist, try crushed cookies or a pinch of sea salt in the center before rolling.7. Variations & Substitutions
– Dairy-free: Use vegan cream cheese and dairy-free chocolate coating. – Nutty version: Fold in finely chopped toasted almonds or hazelnuts for extra texture. – Gluten-free: Ensure your flour swap is gluten-free or omit flour entirely for a simpler dough. – Flavor twists: Add a teaspoon of espresso powder to the dough for a subtle coffee note, or swirl in peanut butter for a marbled effect.Internal links you may find helpful as you experiment with flavors include Big Mac Wraps and Healthy Apple Rice Pancakes for quick, kid-friendly ideas.8. Storage & Reheating
– Store in an airtight container in the refrigerator for up to 5 days. – For longer storage, freeze the truffles on a sheet pan until solid, then transfer to a freezer-safe bag for up to 2 months. – Thaw in the refrigerator or at room temperature for 15–20 minutes before serving to restore the smooth bite. – Re-dip or re-melt chocolate if the coating loses gloss after storage. A quick warm dip refreshes the shell.9. FAQ
Is it safe to eat raw cookie dough in these truffles?
Yes, if you use heat-treated flour or a store-bought edible dough and do not include raw eggs, the dough is safe to eat. Raw eggs can pose a risk, so choose egg-free dough or heat-treated flour for safety.
Can I freeze these truffles after dipping?
Absolutely. Freeze them on a parchment-lined tray until fully set, then transfer to a sealed container. They keep well for up to 2 months. Thaw briefly before serving for best texture.
What if my dough is too sticky to roll?
Chill the dough for 15–20 minutes to firm it up. You can also dust your hands with a little powdered sugar or use a light coating of cold water on your palms to prevent sticking.
Can I make this dairy-free or vegan?
Yes. Use dairy-free butter and vegan cream cheese, and coat with dairy-free chocolate. The flavors remain rich and the texture stays creamy when dairy-free swaps are used.
10. Conclusion
No bake cookie dough truffles offer a blissfully simple way to satisfy a chocolate craving with a chic, restaurant-worthy finish. The dough is creamy, the shell is glossy, and the result is a bite-sized treat that feels indulgent without being heavy. With a few pantry staples and a little chilling time, you can whip up a tray of these crowd-pleasing truffles in under an hour. Ready to share or gift, they’ll disappear in a heartbeat. Print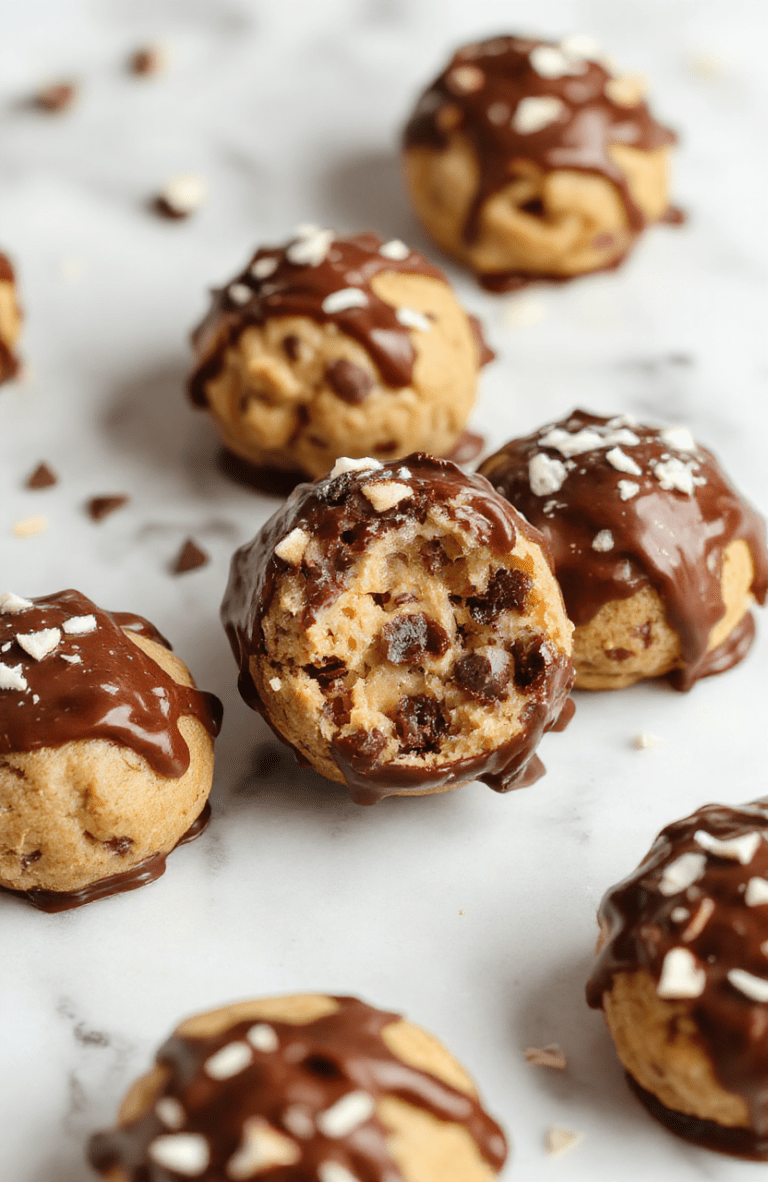
Ultimate Easy Cookie Dough Truffles No Bake Treat
Creamy, no bake cookie dough truffles coated in chocolate, made with heat treated flour and pantry staples. Quick, indulgent, and perfect for gifting or a weeknight treat.
- Total Time: 15 minutes
- Yield: 12 truffles
Ingredients
- 1/2 cup unsalted butter, softened
- 1/2 cup creamy peanut butter
- 1/2 cup light brown sugar, packed
- 1/2 cup powdered sugar
- 1 teaspoon vanilla extract
- 1 cup heat treated all purpose flour
- 1/4 teaspoon salt
- 1/2 cup mini chocolate chips
- 8 ounces semisweet chocolate, melted with 1 tablespoon coconut oil for coating
Instructions
- Heat treat flour by toasting in a 350 F oven for 5 minutes or microwaving with 2 tablespoons water, then cool completely.
- Beat butter, peanut butter, brown sugar, powdered sugar, and vanilla until creamy.
- Stir in heat treated flour and salt, then fold in mini chocolate chips.
- Chill dough 20–30 minutes, then roll into 1 inch balls.
- Melt chocolate with coconut oil and dip dough balls, placing on parchment until set.
- Optional: drizzle with extra melted chocolate or roll in cocoa powder or chopped nuts before coating sets.
Notes
- Heat treating flour makes the dough safe to eat raw.
- Chill time helps the dough hold its shape for rolling.
- Store in the refrigerator up to 5 days or freeze for longer storage.
- Prep Time: 15 minutes
- Cook Time: 0 minutes
- Method: No-Bake, Chill and Coat
- Cuisine: American
- Diet: Vegetarian, Contains Nuts
Nutrition
- Serving Size: 4 pieces
- Calories: 210 Kcal
- Sugar: 14 g
- Sodium: 60 mg
- Fat: 14 g
- Saturated Fat: 7 g
- Unsaturated Fat: 6 g
- Trans Fat: 0 g
- Carbohydrates: 18 g
- Fiber: 1 g
- Protein: 4 g
- Cholesterol: 15 mg