cheesy, caramelized sweetness of Hawaiian roll grilled cheese — the ultimate 15-minute dinner that feels like comfort food gone upgrades 🥪✨
1. Introduction
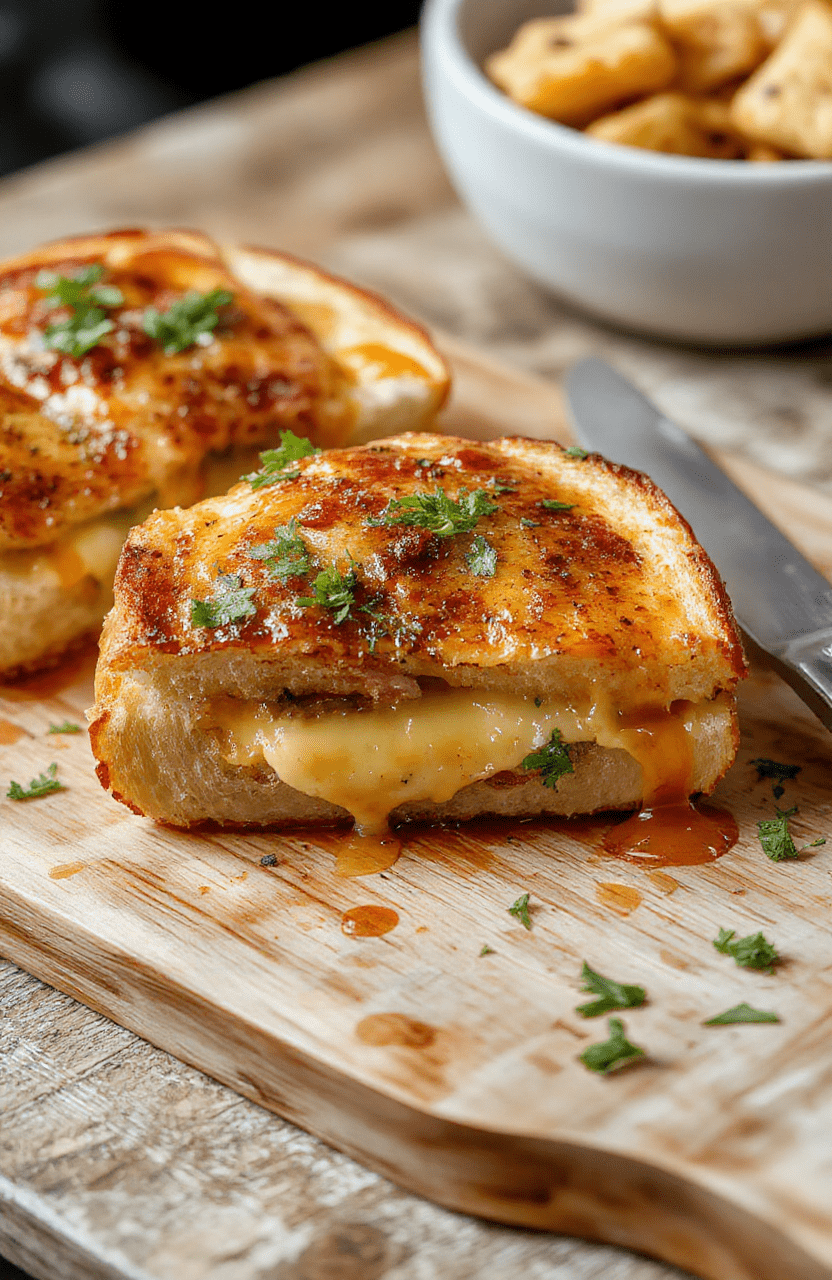
Imagine tender slices of sweet Hawaiian rolls, butter-toasted to golden perfection, oozing with melty cheese and wrapped around a simple yet deeply satisfying filling — that’s this Hawaiian roll grilled cheese dinner in a Nutshell. Forget stale, soggy cafeteria-style sandwiches. This version is quick, indulgent, and packed with flavor — the kind of comfort you crave after a long day. It’s a snap to make thanks to the naturally soft, slightly sweet texture of the rolls, which require no kneading or rising (hello, time-saving genius!). Whether you’re meal prepping for the week or pulling together an easy weeknight dinner, this recipe delivers big on flavor with zero stress.
2. Why You’ll Love This Recipe
- ✅ Ready in 15 minutes or less — perfect for those “what’s for dinner?!” panic moments
- ✅ Minimal ingredients — pantry staples + 1 bag of Hawaiian rolls = dinner done
- ✅ Kid-approved & picky-eater friendly — sweet, cozy, and familiar
- ✅ Great for meal prep — assemble ahead, refrigerate, and grill later
- ✅ Versatile — swap fillings based on what you’ve got (more on that below!)
3. Ingredient Notes
The magic of this recipe lies in simplicity — but choosing the right components makes all the difference.
Hawaiian rolls (like Parker House-style sweet rolls) are non-negotiable here. Their soft, tender crumb and light sweetness brown beautifully and create a “sandwich within a sandwich” effect — crispy outside, fluffy inside. Avoid regular bread or stiff rolls; they won’t yielding the same melt-in-your-mouth contrast.
Cheese: Sharp cheddar is my go-to — it melts smoothly and adds a tangy depth that balances the rolls’ sweetness. But try a blend of Monterey Jack and gruyère for extra richness, or pepper jack for a gentle kick. pre-sliced cheese works great for speed, but freshly grated melts more evenly (and avoids anti-caking agents that can cause greasiness).
Butter: Use high-quality, unsalted butter. It gives better control over seasoning and delivers a richer, deeper brown without burning. Softened butter also spreads more evenly — no torn rolls!
Protein (optional): Thinly sliced deli ham, cooked bacon, or even shredded rotisserie chicken pair *magically* with the sweet-savory profile. Skip it for a vegetarian version — you won’t miss it.
4. Kitchen Tools You Need
You don’t need fancy equipment — just one reliable pan. But if you’re upgrading your setup, here’s what makes this recipe *even easier*:
The Ninja Air Fryer Pro Crisp & Roast 4-in-1 is a game-changer for hands-off, evenly browned grilled cheese in minutes — no flipping or watching required. Set it at 350°F for 3–4 minutes and walk away. Perfect texture, every time.
For stovetop perfection, a well-seasoned T-fal 14-Piece Hard Anodized Nonstick Cookware Set ensures even heat distribution and effortless release (no more cheese-crust stuck to the pan!).
And if you love breakfast + dinner combos, the Breville Nespresso Vertuo Creatista Espresso & Coffee Maker means fresh coffee is ready before your grilled cheese finishes — because yes, this meal pairs *beautifully* with a creamy latte.
5. How to Make Hawaiian Roll Grilled Cheese
Prep (2 minutes)
Remove 4–6 Hawaiian rolls from their bag. Slice them horizontally — like a hamburger bun — but save the top and bottom as a “hinge.” Gently pull apart the halves. No need for precision; lopsided is fine (homey charm!).
Spread softened butter on both inner sides of *each* roll half — think mayonnaise-thin layer, not a thick paste. Too much butter = soggy, greasy sandwich; too little = pale, dryresults. Aim for golden, not burnt.
Fill & Assemble (3 minutes)
Layer cheese (½ cup per sandwich) evenly on the bottom halves. Add optional fillings: 2–3 thin ham slices, or crumbled bacon, or shredded chicken. Top with the other roll half (buttered side up, facing out). Gently press down — just enough to seal, not so hard you squish out the filling.
Grill (6–8 minutes total)
Heat a skillet over medium-low heat (not too hot!). Add a pat of butter, swirl to coat. Place sandwiches in the pan — they should sizzle softly, not smoke. Cook 3–4 minutes per side, or until deep golden brown and crispy. Press gently with a spatula to encourage even browning. Pro visual cue: The edges should look caramelized and slightly crisp — not pale or burnt. If the bottom browns too fast, lower the heat.
Let rest 2 minutes before serving — this lets the cheese set so it doesn’t slide out on your plate. Serve warm, slightly messy, and utterly irresistible.
6. Expert Tips for Success
- Butter temperature matters: Cold butter tears the rolls; melted butter pools and burns. Use softened butter — press your thumb in; it yields just slightly.
- Low and slow = crisp, not charred: High heat causes the outside to burn before the cheese melts.Patience pays off in texture.
- Cheese must be room temp: Cold cheese doesn’t melt evenly. Take it out 10 minutes before assembly.
- Optional toast test: If unsure, toast one leftover roll half plain first. Is it dry or too sweet? Adjust butter next time.
7. Variations & Substitutions
Vegetarian option: Swap ham for roasted red peppers, sautéed spinach, or caramelized onions — add a swipe of Dijon mustard for umami depth.
Gluten-free: Use gluten-free sweet rolls (look for those made with rice or almond flour) and confirm all fillings are GF-certified.
Dairy-free: Try vegan cheddar shreds (like Miyoko’s or Violife) and vegan butter (Earth Balance works well). The toast may be less golden, but still delicious!
Spicy twist: Add a slice of jalapeño or a dash of hot sauce inside — or use spicy pepper jack cheese and a smear of chipotle mayo.
Breakfast version: Add a fried or poached egg on top — runny yolk + sweet bread = next-level indulgence.
8. Storage & Reheating
Refrigerator: Store assembled (uncooked) or cooked sandwiches wrapped in foil or in an airtight container for up to 2 days. Best eaten fresh — reheating changes texture slightly.
Reheat from raw: Uncooked assembled sandwiches can be grilled straight from the fridge. Add 1–2 minutes to cooking time.
Reheat cooked: Toast in a 350°F oven for 5–6 minutes, or air fry at 325°F for 2–3 minutes. Microwaving makes the bread chewy — avoid unless in a true pinch (and cover with a damp paper towel).
9. FAQ
Can I use a toaster oven instead of a skillet?
Absolutely! Place Sandwiches on a baking sheet, butter-side up, and broil for 2–3 minutes per side — watch closely to prevent burning.
Do Hawaiian rolls have to be sweet?
Yes — their signature lightly sweet flavor is what makes this sandwich *Hawaiian*. Stick with the original — plain dinner rolls won’t give you the same perfect sweet-savory balance.
Why is my grilled cheese soggy?
Mostly due to too much butter, insufficient heat, or assembling while cheese is cold. Also, avoid adding wet fillings (like raw tomato or cucumber) — they release water and break down the bread.
Can I make this ahead for a party?
Yes! Prep 1 hour ahead, wrap individually in parchment, and store in the fridge. Grill or air fry just before serving. Perfect for Super Bowl snacks — try cutting them into fingers for sliders! (See our easy buffalo chicken sliders for a savory twist.)
10. Conclusion
This Hawaiian roll grilled cheese dinner proves that the easiest meals often bring the most joy — warm, cheesy, and nostalgic with just a hint of sweetness. In under 15 minutes, you’ve created something that feels celebratory, even on a plain Tuesday. Pair it with a simple side salad or your favorite soup (we love pairing it with the dump-and-go smothered pork chops for a hearty combo!), and enjoy every golden, melty bite. And hey — if you’re craving dessert next, let this be your sign to dive into the ultimate moist chocolate banana bread. Sweet end to a sweet, simple meal. 😋
Print
Quick Hawaiian Roll Grilled Cheese Dinner
A fast, gooey, and sweet-savory grilled cheese using Hawaiian rolls—perfect for busy weeknights. No kneading, no waiting—just toast, fill, and serve.
- Total Time: 10 minutes
- Yield: 2 sandwiches
Ingredients
- 4 thick slices Hawaiian rolls (about 2 small rolls)
- 4 slices American cheese (or cheddar for sharper flavor)
- 2 tbsp unsalted butter, softened
- Pinch of flaky sea salt (optional)
- Butter for spreading
Instructions
- Preheat a nonstick skillet or griddle over medium-low heat.
- Butter one side of each Hawaiian roll slice.
- Place two slices, buttered side down, on the skillet. Top each with cheese and another roll slice (buttered side up).
- Cook 2–3 minutes per side, until golden brown and cheese is melted. Press gently with a spatula.
- Sprinkle with flaky salt if desired and serve immediately.
Notes
- For extra indulgence, add a thin slice of deli ham or pineapple between the cheese.
- Cook on low to medium-low to avoid burning the sweet dough before cheese melts.
- Use a lid or foil tent for 30 seconds to help cheese melt faster.
- Prep Time: 2 minutes
- Cook Time: 8 minutes
- Method: Grilling
- Cuisine: American
- Diet: Vegetarian
Nutrition
- Serving Size: 1 sandwich
- Calories: 420 Kcal
- Sugar: 12g
- Sodium: 580mg
- Fat: 24g
- Saturated Fat: 14g
- Unsaturated Fat: 8g
- Trans Fat: 0g
- Carbohydrates: 42g
- Fiber: 1g
- Protein: 12g
- Cholesterol: 60mg