
🍯 Crispy-Edged, Sticky Honey Garlic Glazed Chicken with Roasted Vegetables — Your New Weeknight Hero! 🍯
1. Introduction
There’s something deeply satisfying about a sticky honey garlic chicken dish that glistens on your plate—caramelized edges, tender chicken, and veggies roasted until just tender-crisp. This recipe delivers exactly that: a glossy, slightly tangy-sweet glaze that clings to each bite, making every mouthful a flavor burst. It’s an easy weeknight chicken dinner you’ll crave on busy nights but feel proud to serve on slower weekends. Bonus? One pan, minimal cleanup, and you’ll have a complete, balanced meal ready in under 40 minutes.
2. Why You’ll Love This Recipe
- Ready in 35 minutes — From chop to fork, faster than takeout.
- One-pan wonder — No extra bowls, no extra stress. Just chicken, veggies, and glaze sizzling away together.
- Balanced flavors — Rich garlic, bright lemon, deep honey, and a hint of ginger cut through the sweetness for depth.
- Family-friendly & crowd-pleasing — Even picky eaters finish their plates with this one.
- Meal-prep magic — Stays delicious reheated, great for lunches all week.
3. Ingredient Notes
The magic in this one-pan honey garlic chicken lies in the quality and layering of a few key ingredients:
- Chicken thighs — I prefer boneless, skinless thighs over breasts because they’re more forgiving, retain moisture, and absorb flavor beautifully. If you’re on leaner蛋白 goals, breasts work too — just don’t overcook them!
- Garlic, freshly minced — Pre-minced is *fine* in a pinch, but fresh garlic gives that bright, pungent backbone crucial for the glaze. Don’t skip the squeeze of garlic skin — it mellows and deepens the flavor.
- Economy honey — Use a light floral honey like clover for balance. Wildflower or manuka bring more complexity, but cost more. Avoid overly robust honeys (like buckwheat) unless you’re doubling the soy.
- Fresh ginger — Grated, not powdered. Its citrusy bite lifts the entire dish.
- Soy sauce (or tamari for GF) — Salty depth and umami are key. Low-sodium gives better control over seasoning.
- Vegetables — I love broccoli florets, sliced bell peppers (any color), and baby carrots. They caramelize beautifully alongside the chicken and won’t get mushy.
If you want to go beyond the basics, try roasted Brussels sprouts or sugar snap peas — they’ll hold up just as well.
4. Kitchen Tools You Need
You don’t need a fortress of gadgets for this, but having the right tools makes the process smoother and more reliable:
For smaller kitchens or air fryer fans, the Compact 6-in-1 Digital Air Fryer by Amazon Basics makes reheating leftovers crispier than the oven. If you’re upgrading your full cookware collection, the T-fal 14-Piece Hard Anodized Nonstick Cookware Set includes a perfect oven-safe skillet for glazing and roasting in one pan — clean-up is a breeze.
Want more versatility? The Ninja Foodi Smart XL Indoor Grill & Air Fryer Combo gives you the char and crisp you’d get on the grill, without smoke or weather concerns — ideal for winter cooking.
For serious meal preppers, the Crock-Pot Family-Size Slow Cooker shines in my dump-and-go recipes like Smothered Pork Chops — but here, we’ll keep it fast and hot.
To prep veggies faster, the Fullstar Ultimate Veggie Prep Master slices, dices, and juliennes in seconds. It’s been a total game-changer on my busiest weeknights.
5. How to Make Sticky Honey Garlic Chicken with Vegetables
This method ensures golden, caramelized chicken without drying it out — and veggies that stay vibrant, not soggy.
Phase 1: Prep & Marinate (10 minutes)
In a small bowl, whisk together 4 tablespoons honey, 3 tablespoons soy sauce, 3 minced garlic cloves, 1 teaspoon freshly grated ginger, 1 tablespoon rice vinegar (or lemon juice), and 1/2 teaspoon red pepper flakes (optional for heat). Set aside.
Pat chicken thighs dry — this is key for browning! Season liberally with salt and black pepper. If you have time, let them rest in 1/3 of the glaze for 15 minutes (or up to 30). Don’t worry — the rest won’t over-marinate like it would with fish.
Phase 2: Sear & Sizzle (10 minutes)
Heat a large, oven-safe skillet (like cast iron or heavy nonstick) over medium-high with 1 tablespoon neutral oil (avocado or grapeseed). Once shimmering, add the chicken in a single layer — don’t crowd the pan. Sear 4–5 minutes per side until golden brown. The edges should look crisp and caramelized.
Push chicken to the sides and add your sliced peppers, broccoli (small florets), and baby carrots. Spoon over some glaze, then Nestle the chicken back on top.
Phase 3: Glaze & Roast (12–15 minutes)
Drizzle the remaining glaze evenly over everything. Transfer the skillet to a preheated 400°F (200°C) oven. Roast for 12–15 minutes, or until chicken hits 165°F internal temperature and veggies are tender with slightly charred edges. I recommend keeping an eye on it after 10 minutes — ovens vary!
Visual cue: You want that glaze to bubble up and coat the chicken like amber syrup — not runny, but glossy.
Phase 4: Rest & Serve
Let the dish rest 5 minutes — this lets the juices redistribute and the glaze thicken further. Garnish with sesame seeds and sliced green onions. Serve over steamed rice, quinoa, or cauliflower rice for a low-carb twist.
6. Expert Tips for Success
- Don’t skip the dry chicken step. Wet chicken steams instead of searing — pat it with paper towels until the surface feels “chalky.”
- Cook veggies in stages. Harder veggies (carrots, broccoli stems) can go in earlier, but tender ones (peppers, sugar snaps) finish faster. Adjust your chopping so they’re similar in size to the chicken pieces for even cooking.
- Glaze in two batches. Reserve half of the sauce until the end — raw garlic can burn if added too early. Adding it later preserves brightness and avoids bitterness.
- Use a thermometer. Chicken thighs are forgiving, but overcooked breasts turn chalky. Pull at 160°F — carryover heat finishes the job.
- Acid is your friend. A splash of rice vinegar or lime juice at the end brightens the whole dish. Sweetness can feel heavy without it.
7. Variations & Substitutions
Need to adapt this for diet, taste, or what’s in your pantry? No problem:
- Gluten-free — Swap soy sauce for tamari or Coconut Aminos.
- Low-sugar/keto — Use monk fruit sweetener blend (like Swerve) instead of honey, and reduce soy slightly.
- Spicier version — Add 1 tablespoon sriracha or 1/2 teaspoon crushed red pepper flakes to the glaze.
- Protein_swap — Works beautifully with shrimp (add last 5 minutes) or tofu cubes (bake 15–18 mins).
- Veggie rotation — Zucchini, green beans, cherry tomatoes (add last 5 mins), or mushrooms all shine.
- Sauce thickener — If it’s too thin, mix 1 tsp cornstarch with 1 tbsp cold water and stir in during the last 2 minutes on the stovetop.
8. Storage & Reheating
Fridge — Store in airtight containers (like the JoyJolt Airtight Glass Food Storage Set) for up to 4 days. Keep chicken and veggies separate if possible — the glaze can soften the veggies over time.
Reheat — For best texture, reheat in a 350°F oven or air fryer (375°F for 5–7 mins) to restore crispness. Microwaving works in a pinch, but chicken may soften. Add a splash of water or broth to prevent drying.
Freezer — Freeze chicken and sauce separately for up to 3 months. Thaw overnight in the fridge, then reheat gently.
9. FAQ
Can I make this in the air fryer?
Yes! Cube the chicken, toss in 2/3 of the glaze, and air fry at 375°F for 10–12 minutes (shake halfway). Add veggies in the last 5 minutes. For crispier results, broil 1–2 minutes at the end.
Why is my glaze too runny?
Honey thins when heated. If the glaze seems watery after cooking, turn the heat to low and simmer 2–3 minutes to reduce — it will thicken as it cools. Cornstarch slurry fixes it fast if you’re short on time.
What’s the best side for this dish?
Steamed jasmine or basmati rice is classic. For a veggie boost, try my Sweet & Spicy Honey Pepper Chicken recipe’s garlic butter green beans — they’re fantastic alongside. Crusty bread soaks up the leftover sauce like a dream!
Can I double the recipe?
Absolutely — just ensure your pan isn’t overcrowded. Use two skillets or roast in batches. Doubling works great for batch-cooking — great for Game Day or meal prep feasts.
10. Conclusion
This sticky honey garlic chicken is the kind of weeknight recipe that stops the “what’s for dinner?” panic and delivers flavor, ease, and elegance — all from one pan. With its sticky-sweet glaze, caramelized edges, and vibrant veggies, it’s a reminder that simple ingredients, treated well, make unforgettable meals. Whether you’re cooking for two or prepping for four days, this dish delivers. Give it a try, and enjoy the “wow” sigh that comes with each bite. 🍗✨
Love this? Check out more crowd-pleasers like Ultimate Moist Chocolate Banana Bread for dessert or Best Super Bowl Appetizers for your next gathering.
Print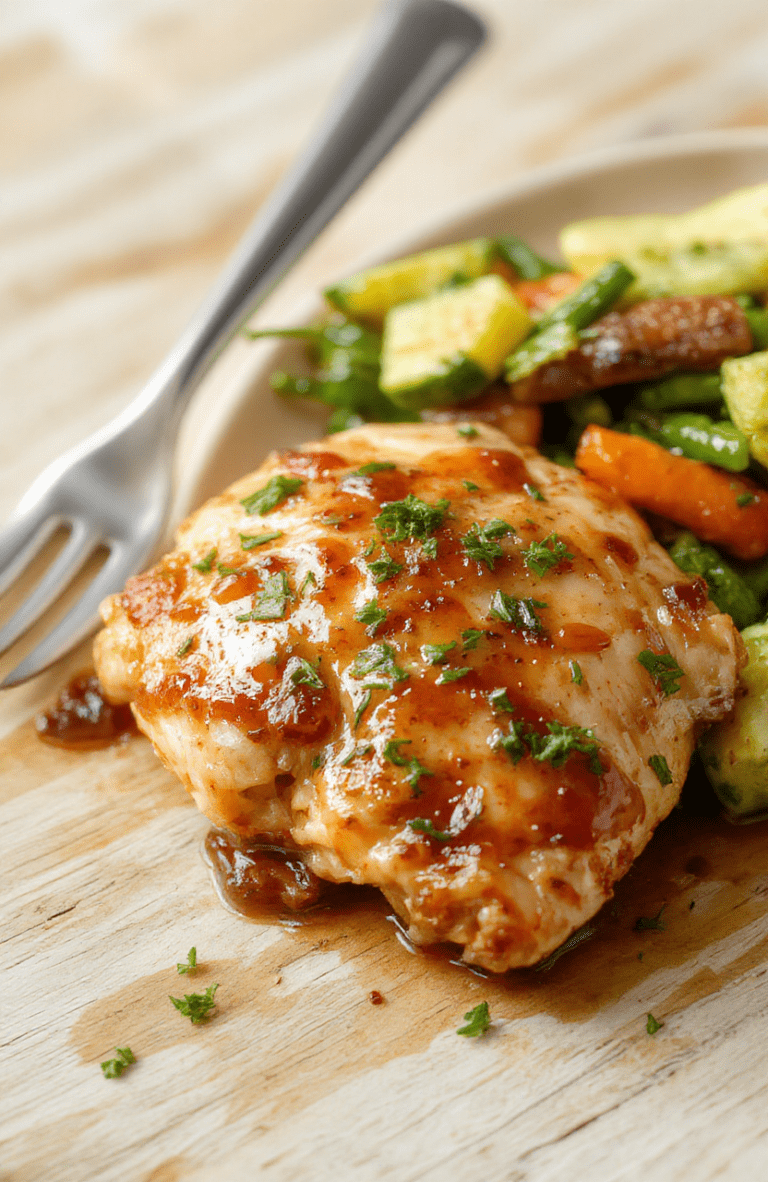
Honey Garlic Glazed Chicken with Vegetables
Quick, sticky, savory-sweet honey garlic chicken with roasted veggies — ready in under 30 minutes!
- Total Time: 30 minutes
- Yield: 4 servings
Ingredients
- 1.5 lbs boneless, skinless chicken thighs
- 2 tbsp olive oil
- 4 garlic cloves, minced
- 3 tbsp honey
- 2 tbsp soy sauce (low-sodium)
- 1 tbsp rice vinegar
- 1 tsp sesame oil
- 1/2 tsp red pepper flakes (optional)
- Salt & black pepper to taste
- 1 cup broccoli florets
- 1 red bell pepper, sliced
- Sesame seeds & green onions for garnish
Instructions
- Preheat oven to 425°F (220°C). Line a baking sheet with parchment paper.
- In a bowl, whisk honey, soy sauce, garlic, rice vinegar, sesame oil, red pepper flakes, salt, and pepper.
- Toss chicken thighs with half the sauce, then arrange on baking sheet. Surround with broccoli and bell pepper.
- Roast 20–22 minutes until chicken reaches 165°F (74°C) and veggies are tender-crisp.
- Brush remaining sauce over chicken in last 3–4 minutes of baking for caramelization.
- Garnish with sesame seeds and green onions before serving.
Notes
- For extra crispiness, broil for 1–2 minutes at the end.
- Double the sauce and drizzle over rice or noodles for a complete meal.
- For vegan version, substitute chicken with extra-firm tofu or tempeh and use maple syrup.
- Prep Time: 10 minutes
- Cook Time: 20 minutes
- Method: Roasting
- Cuisine: Asian-inspired American
- Diet: Gluten-free option with tamari
Nutrition
- Serving Size: 1 thigh + 1/2 cup veggies
- Calories: 310 Kcal
- Sugar: 18g
- Sodium: 420mg
- Fat: 12g
- Saturated Fat: 2.5g
- Unsaturated Fat: 8g
- Trans Fat: 0g
- Carbohydrates: 24g
- Fiber: 3g
- Protein: 28g
- Cholesterol: 75mg